How to rip DVD to computer?
Big Situation: DVDs continue to be the most popular media for playing movies, but as DVDs become older, they are prone to scratches and other physical imperfections, which will eventually render them unusable. Ripping DVD to computer is a practical way to rip DVD to computer hard disc before they are too damaged to use. Modern PCs have hard drives large enough to hold hundreds of DVD movies, and the iMacsoft DVD Copy will be excellent.The DVD to Computer Ripping software will be best DVD copier and allow you to easily rip DVD to computer local. All DVD movie files can be ripped into DVD folders or ISO files on computer local. Very easy to use steps you can follow: Insert DVD-->Select the destination-->Start to rip DVD to computer
 2.47 MB
 $32.00
Step 1: Insert movie DVD
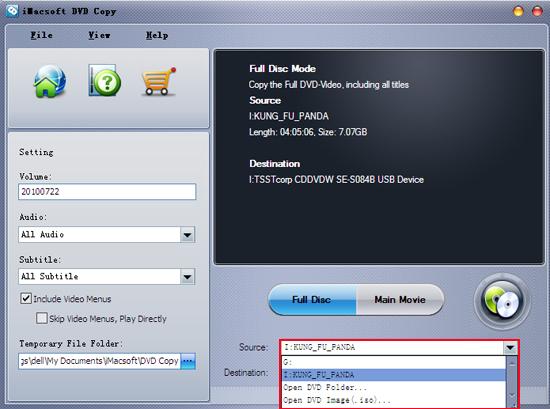
Place the DVD into the computer's DVD drive. Windows will attempt to auto-play the drive with the default media player. "Cancel" that operation.
Open iMacsoft DVD Copy. The DVD to Computer Ripping program will typically detect the DVD drive with the DVD in it automatically, but if there are multiple drivers in the computer, a manual selection may be required. Click the drop-down box under "Source" and select the certain drive with the movie DVD. If the correct drive has been selected, then the space to the right will display the files on the DVD.

Step 2: Output Settings.
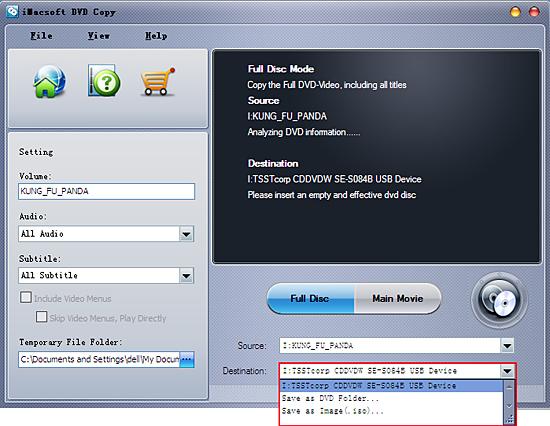
Select the destination folder by clicking "Destination" drop-down list. Change the destination to whatever video library folder is already set up on the computer. If such a folder has not been created, then simply create a folder with an easy-to-remember name on one of the available hard drives. Also make sure that a sub-folder inside the new video library folder is created, bearing the name of the DVD that is being ripped.
Select the destination folder by clicking "Destination" drop-down list. Change the destination to whatever video library folder is already set up on the computer. If such a folder has not been created, then simply create a folder with an easy-to-remember name on one of the available hard drives. Also make sure that a sub-folder inside the new video library folder is created, bearing the name of the DVD that is being ripped.

Step 3: Rip DVD to computer
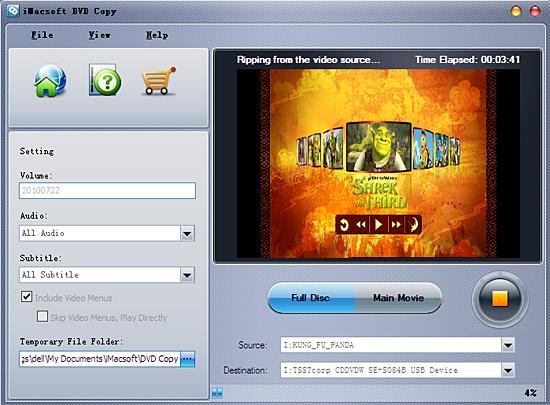
Click on the icon at the bottom of DVD to computer ripping program, a separated window pops up. The window will change to show the progress of the decryption. The amount of time DVD ripping takes is influenced mainly by CPU speed and the number of cores available. A Netbook may take half an hour, while a Quad-Core system will likely take five or ten minutes.
Click on the icon

|
Hot Tags: |
||||
Ready to try or buy?
 2.47 MB
 $32.oo
 -
- iPod to Mac Transfer

- iPhone to Mac Transfer

- iPad to Mac Transfer

- iPhone Ringtone Maker for Mac

- iPhone SMS to Mac Transfer

- iPhone Contact to Mac Transfer
- iPhone Call List to Mac Transfer
- iPhone iBooks to Mac Transfer

- iPhone Photo to Mac Transfer
- DVD to iPod Converter for Mac
- DVD to iPhone Converter for Mac
- DVD to iPad Converter for Mac

- iPod Video Converter for Mac
- iPhone Video Converter for Mac
- iPad Video Converter for Mac
- iPod to Mac Transfer
-
- Mac DVD Toolkit

- iPod Mate for Mac

- iPhone Mate for Mac

- iPad Mate for Mac

- DVD Ripper Suite for Mac
- DVD Maker Suite for Mac
- DVD to iPod Suite for Mac
- DVD to iPhone Suite for Mac
- DVD to iPad Suite for Mac
- DVD to MP4 Suite for Mac
- DVD to Apple TV Suite for Mac
- DVD Audio Ripper Suite for Mac
- DVD to FLV Suite for Mac
- DVD to PSP Suite for Mac
- Mac DVD Toolkit


