How to convert WAV to MP3 audio files?
"People who like downloading free audio resources via internet mostly are in OGG, APE, WAV, AAC or FLAC formats always ask that, "why can't I play the free audios on my iPad, iPod, iPhone, PSP, Mobile, etc. devices?" And others may also say that, "How can I make a MP3 or M4A segment from my favorit music as an fair-sounding ringtone?" iMacsoft Audio Maker is the answer you are looking for! It not only provides an easy and completed way to convert between all popular audio formats."The article focuses on how to convert WAV to MP3 audio file using iMacsoft Audio Maker software? The following will show you a step by step guide to complete WAV to MP3 conversion task.
1: Load Video Files
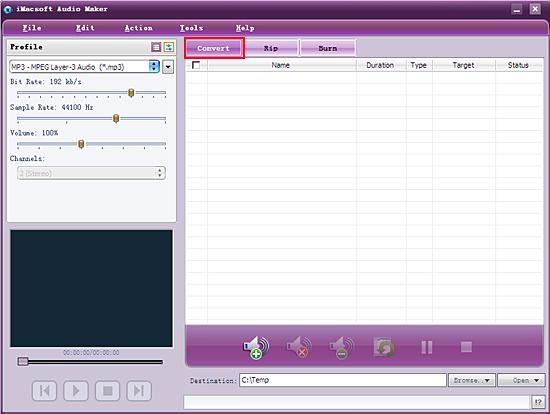
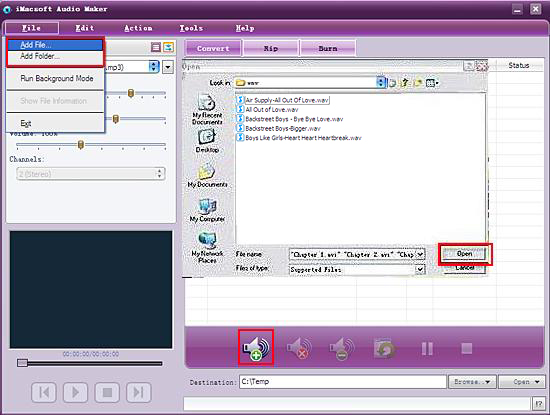
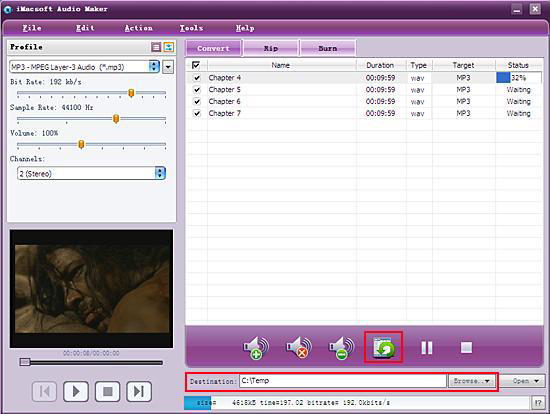
Launch iMacsoft Audio Maker, and in the main interface, click the “Convert” tab to get the Audio Converter function. And then load audio files from local by clicking "Add" button or select "Add File…" option in the "File" menu.
2. Show the file infomation
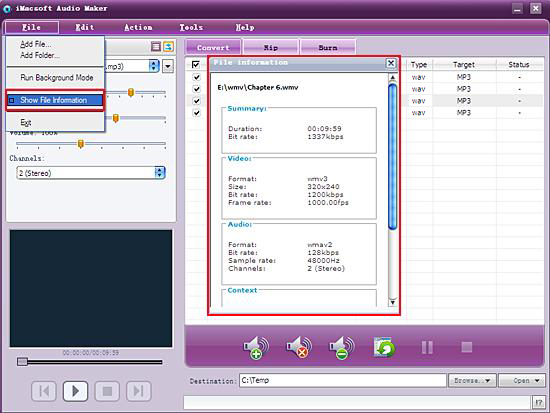
Open the original file information dialog by double-clicking the selected original file or choose "Show file information" item in the "File" top menu. It will show you the preferences of the original file such as: Duration, Audio Format, Bit Rate, Sample Rate, Artist, Title, etc.
Open the original file information dialog by double-clicking the selected original file or choose "Show file information" item in the "File" top menu. It will show you the preferences of the original file such as: Duration, Audio Format, Bit Rate, Sample Rate, Artist, Title, etc.
3: Specify output format
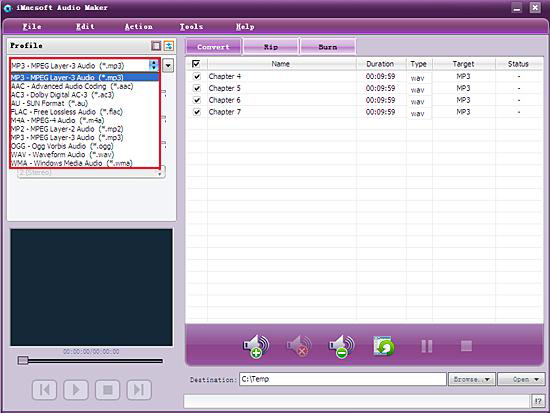
Specify the target file format you want to convert. Choose one or several files you loaded and then select output profile "MP3-MPEG Layer-3 Audio (*.mp3)" from "Profile" combo-box.
Specify the target file format you want to convert. Choose one or several files you loaded and then select output profile "MP3-MPEG Layer-3 Audio (*.mp3)" from "Profile" combo-box.
4: Set output path and start converting
To set the folder that you want to save your target files, you may select the output folder by clicking "Browse…" button or directly enter a path in the "Destination" box. "C:\Temp" is set as the default destination folder. After done, just click "Convert" button to start your conversion.
To set the folder that you want to save your target files, you may select the output folder by clicking "Browse…" button or directly enter a path in the "Destination" box. "C:\Temp" is set as the default destination folder. After done, just click "Convert" button to start your conversion.
|
Hot Tags: |
||||
Ready to try or buy?
 4.90 MB
 $20.oo
 -
- iPod to Mac Transfer

- iPhone to Mac Transfer

- iPad to Mac Transfer

- iPhone Ringtone Maker for Mac

- iPhone SMS to Mac Transfer

- iPhone Contact to Mac Transfer
- iPhone Call List to Mac Transfer
- iPhone iBooks to Mac Transfer

- iPhone Photo to Mac Transfer
- DVD to iPod Converter for Mac
- DVD to iPhone Converter for Mac
- DVD to iPad Converter for Mac

- iPod Video Converter for Mac
- iPhone Video Converter for Mac
- iPad Video Converter for Mac
- iPod to Mac Transfer
-
- Mac DVD Toolkit

- iPod Mate for Mac

- iPhone Mate for Mac

- iPad Mate for Mac

- DVD Ripper Suite for Mac
- DVD Maker Suite for Mac
- DVD to iPod Suite for Mac
- DVD to iPhone Suite for Mac
- DVD to iPad Suite for Mac
- DVD to MP4 Suite for Mac
- DVD to Apple TV Suite for Mac
- DVD Audio Ripper Suite for Mac
- DVD to FLV Suite for Mac
- DVD to PSP Suite for Mac
- Mac DVD Toolkit


