How to converter DVD to H.264 for Apple TV on Mac?
Think about all DVD collections packed up on your Mac, finding them can be such a challenge. Have you ever tried to create high-quality H.264 video of your DVD movies? Converting DVD to H.264 is definitely the perfect way, in which you could get high quality video backups. This guide will show you how to convert DVD to H.264 for your own personal DVD backups. Here I'm trying to present you a quick solution on how to convert DVD to H.264 for Apple TV with iMacsoft DVD to Apple TV Converter for Mac.1. Load movie DVD
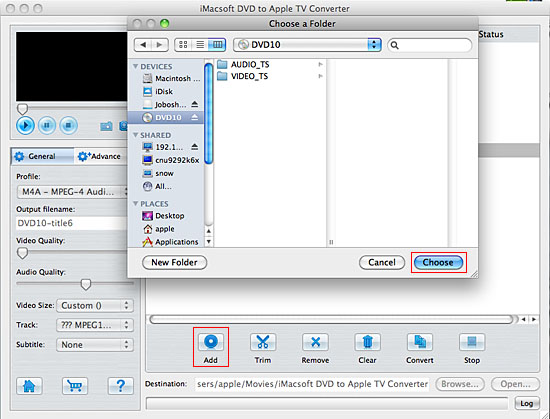
Launch the DVD to Apple TV Converter for Mac and insert movie DVD into DVD-Rom Driver on Mac. And you will see the software can automatically detect DVD contents and display all DVD infomation in the file list. If you wanna load movie DVD manually, please click "Add" button and select DVD in the pop-up window and press "Choose" button or choose "Add..." option in the top "File" menu to load DVD.

2. Select MP4 video profile
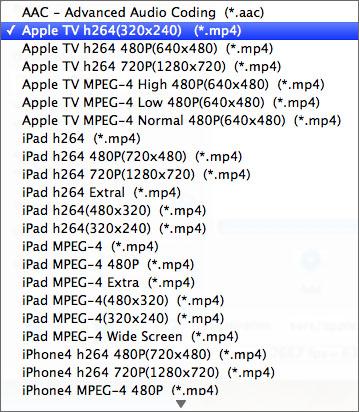
In the left part of the software, you can see "Profile" combo box in the "General" panel, you can click the box list and select "Apple TV h264(320*240) (*.mp4)" option to output h.264 video format from DVD. The software also allow you output various video or audio formats from several DVD titles or chapters.
In the left part of the software, you can see "Profile" combo box in the "General" panel, you can click the box list and select "Apple TV h264(320*240) (*.mp4)" option to output h.264 video format from DVD. The software also allow you output various video or audio formats from several DVD titles or chapters.
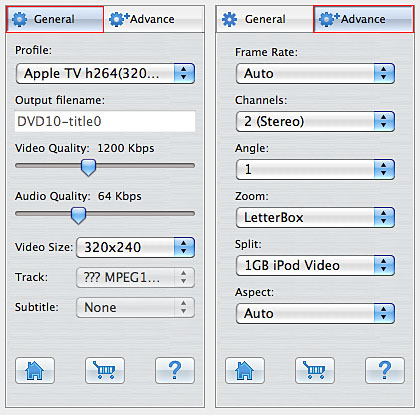
Tip: You can edit the info of output files to meet your need, even specify parameters setting for unique output. This software provides you with "General" and "Advance" panel that covers info edition and parameter settings, such as Output Filename, Video Quality, Audio Quality, Video Size, Track, Subtile, Frame Rate, Channel, Angle, Zoom, Split and Aspect.
3. Set output path and start conversion
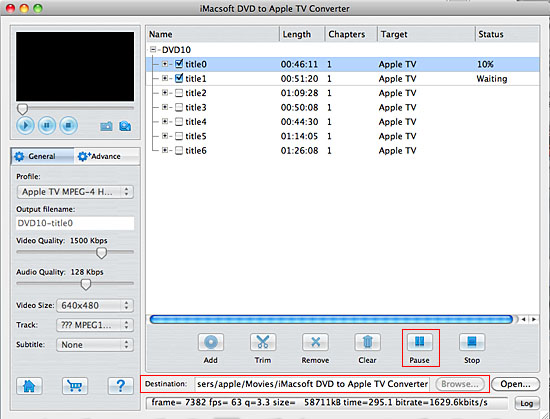
Click "Browse" button to choose output destination folder on Mactoshi HD. And then check the needed chapters or titles in the file list for ready to rip, click "Start Ripping" button on the toolbar to start ripping DVD to H.264 video files. You can view the progress of the ripping process in the progress bar. Then press "Open" button to search the ripped h.264 video files and transfer these files to Apple TV.
Click "Browse" button to choose output destination folder on Mactoshi HD. And then check the needed chapters or titles in the file list for ready to rip, click "Start Ripping" button on the toolbar to start ripping DVD to H.264 video files. You can view the progress of the ripping process in the progress bar. Then press "Open" button to search the ripped h.264 video files and transfer these files to Apple TV.
Tip: Clip any segment
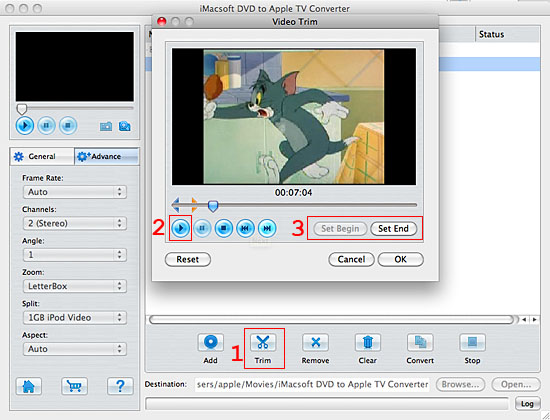
Select and check a chapter or title in the file list, click "Trim" button in the toolbar to open "Video Trim" window. You can clip the original video into several parts by setting start and end point exactly. Then convert and output them separately or as a whole one. You can also re-trim segment by click "Reset" button if the previous one doesn't satisfied.
Select and check a chapter or title in the file list, click "Trim" button in the toolbar to open "Video Trim" window. You can clip the original video into several parts by setting start and end point exactly. Then convert and output them separately or as a whole one. You can also re-trim segment by click "Reset" button if the previous one doesn't satisfied.
Video Snapshot
You are capable to make a stylish album using the snapshots taken from the video with this software. Click "Capture Frame" button at the left top of the main interface to take snapshot when playing the video and save as BMP, click "Open Snapshot Folder" to check the snapshot. You can also define the destination in your hard disk to save the snapshots.
You are capable to make a stylish album using the snapshots taken from the video with this software. Click "Capture Frame" button at the left top of the main interface to take snapshot when playing the video and save as BMP, click "Open Snapshot Folder" to check the snapshot. You can also define the destination in your hard disk to save the snapshots.

|
Hot Tags: |
||||
Ready to try or buy?
-
- iPod to Mac Transfer

- iPhone to Mac Transfer

- iPad to Mac Transfer

- iPhone Ringtone Maker for Mac

- iPhone SMS to Mac Transfer

- iPhone Contact to Mac Transfer
- iPhone Call List to Mac Transfer
- iPhone iBooks to Mac Transfer

- iPhone Photo to Mac Transfer
- DVD to iPod Converter for Mac
- DVD to iPhone Converter for Mac
- DVD to iPad Converter for Mac

- iPod Video Converter for Mac
- iPhone Video Converter for Mac
- iPad Video Converter for Mac
- iPod to Mac Transfer
-
- Mac DVD Toolkit

- iPod Mate for Mac

- iPhone Mate for Mac

- iPad Mate for Mac

- DVD Ripper Suite for Mac
- DVD Maker Suite for Mac
- DVD to iPod Suite for Mac
- DVD to iPhone Suite for Mac
- DVD to iPad Suite for Mac
- DVD to MP4 Suite for Mac
- DVD to Apple TV Suite for Mac
- DVD Audio Ripper Suite for Mac
- DVD to FLV Suite for Mac
- DVD to PSP Suite for Mac
- Mac DVD Toolkit


