How to convert video AVI to DVD disc?
While you download movies from the internet and videos recorded with digital camcorders are always AVI format, how to convert AVI to certain format supported by DVD and burn AVI video to DVD disc so that you can watch AVI video and movie on a standard DVD player. But how to? It is an important question for most of us.You can simply convert AVI to DVD folder or ISO files to share with friends and family who have computers, but if the people you want to share the movie with don't have a computer, what will you do? With AVI to DVD converter, burning AVI to DVD disc for them is not that difficult. In this tutorial we will show you the most easy-to-use way of burning AVI to DVD using iMacsoft AVI to DVD Converter.
 13.90 MB
 $28.oo
 Free download and run AVI to DVD Converter and click "Add Video File" button on the toolbar or click "File > Add Video File(s)…" option from the main menu to load AVI video files you want to burn. Or directly drag files into iMacsoft AVI to DVD Converter inferface.
Tip: Click "File > Add Video Folder…" option from the top menu or press "Add Video Folder" to choose a folder and load all the video files in this folder into the file list.
Step2: Select output mode in "Destination"
Insert an empty DVD disc, and choose the disc you insert from the "Destination" drop-down list for OK. And enter a name in the "DVD Name" textbox as the output DVD name.
Insert an empty DVD disc, and choose the disc you insert from the "Destination" drop-down list for OK. And enter a name in the "DVD Name" textbox as the output DVD name.
Step3: Convert AVI to DVD
Select the disc type (D5 4.7G; D9 8.5G) you need and click "Start Burn" button at the right bottom of the file list to start AVI to DVD converting.
Select the disc type (D5 4.7G; D9 8.5G) you need and click "Start Burn" button at the right bottom of the file list to start AVI to DVD converting.
Create DVD menu
Click the "Edit" button button and choose one certain template for DVD menu in the bottom-left corner of the main interface. When you enter the next to the "Menu Edit" window, plenty of templates are waitting for you to choose. And you can also add background music/picture, title and menu topic to your menu.
Click the "Edit" button button and choose one certain template for DVD menu in the bottom-left corner of the main interface. When you enter the next to the "Menu Edit" window, plenty of templates are waitting for you to choose. And you can also add background music/picture, title and menu topic to your menu.
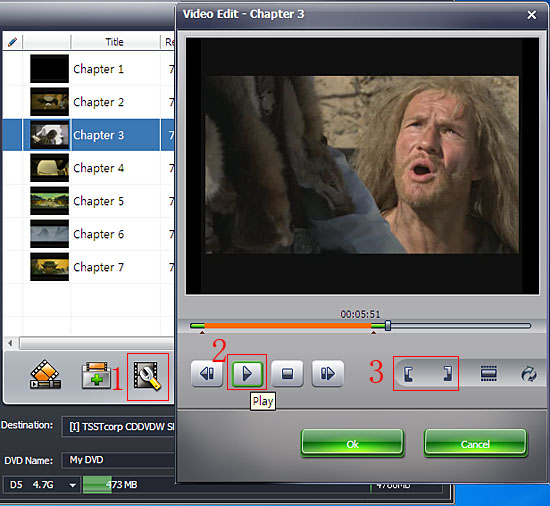
Trim video for DVD burning
Step 1: Select a video file from the File List, and then click the "Trim" button on the Toolbar to open the "Trim Video" window.
Step 2: You can clip a segment in one of two ways:
a) Click the "Play" button to play the video. Click the "Set Start " button at any time to set the start point for the segment; set the segment end point by clicking "Set End " at any time. A new segment will then be added to the Segment List below.
b) Alternatively, scroll the video to the start point of the segment you want to clip, and then click "Set Start Point". Next, scroll the video to the end point of the segment, and then click "Set End Point". A new segment will then be added to the Segment List below.
Step 3: Click the "Reset" button above the Segment List, and then repeat Step 2 to get a new segment. Repeat this process to extract as many segments as you want.
|
Hot Tags: |
||||
Ready to try or buy?
13.90 MB
$28.oo 


-
- iPod to Mac Transfer

- iPhone to Mac Transfer
- iPad to Mac Transfer
- iPhone Ringtone Maker for Mac

- iPhone SMS to Mac Transfer
- iPhone Contact to Mac Transfer
- iPhone Call List to Mac Transfer
- iPhone iBooks to Mac Transfer
- iPhone Photo to Mac Transfer
- DVD to iPod Converter for Mac
- DVD to iPhone Converter for Mac
- DVD to iPad Converter for Mac
- iPod Video Converter for Mac
- iPhone Video Converter for Mac
- iPad Video Converter for Mac
- iPod to Mac Transfer
-
- Mac DVD Toolkit
- iPod Mate for Mac
- iPhone Mate for Mac
- iPad Mate for Mac
- DVD Ripper Suite for Mac
- DVD Maker Suite for Mac
- DVD to iPod Suite for Mac
- DVD to iPhone Suite for Mac
- DVD to iPad Suite for Mac
- DVD to MP4 Suite for Mac
- DVD to Apple TV Suite for Mac
- DVD Audio Ripper Suite for Mac
- DVD to FLV Suite for Mac
- DVD to PSP Suite for Mac
- Mac DVD Toolkit
